Vue开发过程常见问题
Vue
创建文件引入Vue
1
2
3
4
| 第一种方法,建议新手,包含了有帮助的命令和警告
<script src="https://cdn.jsdelivr.net/npm/vue/dist/vue.js"></script>
第二种方法,优化了尺寸和速度
<script src="https://cdn.jsdelivr.net/npm/vue"></script>
|
测试用例:
1
2
3
4
5
6
7
8
9
10
11
12
| <div id="app">
{{message}}
</div>
<script src="https://cdn.jsdelivr.net/npm/vue/dist/vue.js"></script>
<script>
var app = new Vue({
el:"#app",
data:{
message:"Hello Vue!"
}
})
</script>
|
el:挂载点
- Vue实例的作用范围:
el标签命中的内部都能使用
- 使用其他选择器:
标签,id,class都用,最好使用id选择器,因为id大部分时间唯一
- 设置其他dom元素:
可以使用其他的双标签,不能使用html和body
data数据
data内可以为复杂数据类型,调用方法和其他语言几乎一致
Vue指令
v-text
v-text设置在标签中设置文本,也可以对其进行拼接,此处和微信小程序开发用法一样
1
2
3
4
5
6
7
8
9
10
| <div id="app">
<h2 v-text="message"></h2>
</div>
var app = new Vue({
el:"#app",
data:{
message:"Hello Vue!"
}
})
|
v-html
用于设置标签的innerHTML,用法和v-text差不多
但是v-html里面内容会被渲染,v-text则会被当做文本输出
1
2
3
4
5
6
7
8
9
10
11
| <div id="app">
<h2 v-text="message"></h2> --> <div>test</div>
<h2 v-html="message"></h2> --> test
</div>
var app = new Vue({
el:"#app",
data:{
message:"<div>test</div>"
}
})
|
v-on
为元素绑定事件
v-on:”方法”
例如
- 点击事件:v-on:click
- 鼠标移入事件:v-on:monseenter
- 双击事件:v-on:dblclick
- 等…
方法都要写入methods属性中
1
2
3
4
5
6
7
8
9
10
11
12
13
14
15
16
17
18
| <div id="app">
<h2 v-on:click="dolt"></h2>
vue支持将v-on替换为@
<h2 @click="dolt"></h2>
</div>
var app = new Vue({
el:"#app",
data:{
message:"<div>test</div>"
},
methods:{
dolt:function(){
...
}
}
})
|
可以通过事件里面的this来使用data中的数据,可以用=等操作改变data中数据
1
2
3
4
5
6
7
8
9
10
11
| var app = new Vue({
el:"#app",
data:{
message:"test"
},
methods:{
dolt:function(){
this.message = "test1";
}
}
})
|
可以用来传参,直接加括号即可,用法与h5和js用法几乎相同
1
2
3
4
5
6
7
8
9
10
11
12
13
14
15
16
17
18
| <div id="app">
<h2 v-on:click="dolt"></h2>
vue支持将v-on替换为@
<h2 @click="dolt()"></h2>
</div>
var app = new Vue({
        el:"#app",
        data:{
            message:"test"
        },
    	methods:{
            dolt:function(){
                this.message = "test1";
            }
        }
    })
|
v-show
根据表达式的真假,切换元素的显示和隐藏
v-show=”true”则显示
v-show=”false”则隐藏
即可以用v-show=”判断式”来进行操作
1
2
3
4
5
6
7
8
9
10
11
12
13
14
15
| <div id="app">
<h2 v-show="age>=18">显示</h2>
</div>
var app = new Vue({
el:"#app",
data:{
age:15
},
methods:{
dolt:function(){
this.message = "test1";
}
}
})
|
v-if
根据表达式值的真假,切换元素的显示和隐藏(操纵dom元素)
跟v-show用法差不多
v-show适用于频繁切换,反之用v-if
v-show容易泄露用户信息,只是将元素隐藏
v-if则是移除dom树中元素
v-bind
设置元素的属性(比如:src,tittle,class)
使用方法:v-bind:属性名=表达式
1
2
3
4
5
6
7
8
9
10
| <div id="app">
<img v-bind:src="imgSrc">
</div>
var app = new Vue({
el:"#app",
data:{
imgSrc:"图片地址",
}
})
|
其中也可以通过表达式来选择获得
1
2
3
4
5
6
7
8
9
10
11
12
13
14
15
| <div id="app">
方式一:
<img v-bind:src="isActive?'imgSrc':''">
方式二:
<img v-bind:src="{imgSrc:isActive}">
</div>
var app = new Vue({
el:"#app",
data:{
imgSrc:"图片地址",
isActive:false
}
})
|
这里面v-bind可以直接省略掉,只留下:
1
2
3
4
5
6
7
8
9
10
11
| <div id="app">
<img :src="{imgSrc:isActive}">
</div>
var app = new Vue({
el:"#app",
data:{
imgSrc:"图片地址",
isActive:false
}
})
|
v-for
v-for=”变量名 in 目标数据名”
其中该变量名可以直接在本体以及内部使用
1
2
3
4
5
6
7
8
9
10
11
12
| <div id="app">
<ul>
<li v-for="item in arr" :title="item"></li>
</ul>
</div>
var app = new Vue({
el:"#app",
data:{
arr:[1, 2, 3, 4, 5]
}
})
|
可以添加index来获取下标
v-for=”(变量名, index) in 目标数据名”
1
2
3
4
5
6
7
8
9
10
11
12
| <div id="app">
<ul>
<li v-for="(item, index) in arr" :title="item"></li>
</ul>
</div>
var app = new Vue({
el:"#app",
data:{
arr:[1, 2, 3, 4, 5]
}
})
|
可以使用.来获取对象值
v-model
获取和设置表单元素的值(双向数据绑定)
1
2
3
4
5
6
7
8
9
10
11
| <div id="app">
<input type="text" v-model="message"/>
{{message}}
</div>
var app = new Vue({
el:"#app",
data:{
message:"test"
}
})
|
网络应用-axios
简介:功能强大的网络请求库
使用链接
1
| <script src="https://unpkg.com/axios/dist/axios.min.js"></script>
|
请求
方法一:get请求
1
2
3
4
| axios.get(地址).then(function(response){请求相应完成后触发},function(err){错误时触发})
如果需要查询参数,则在地址后加'?'接上查询字符串
axios.get(地址?查询字符串).then(function(response){请求相应完成后触发},function(err){错误时触发})
|
方法二:post请求
1
2
3
4
5
| 方法和get方法类似,但是查询参数方式不一样
axios.post(地址).then(function(response){请求相应完成后触发},function(err){错误时触发})
数据是以参数对象的形式写在第二个参数内部
axios.get(地址,参数对象).then(function(response){请求相应完成后触发},function(err){错误时触发})
|
请求返回值类型均为对象形式
应用
引入
1
| import axios from 'axios';
|
简单使用
1
2
3
4
5
6
7
8
9
10
11
12
| axios({
url: "http://localhost:8080/essays/insertArticle",
method: "Post",
data: JSON.stringify(this.essay),
headers: {
'Content-Type': 'application/json'
}
}).then((res) => {
// console.log("success!")
this.reset();
this.sub_success = true
})
|
element-ui
跳转element-ui笔记
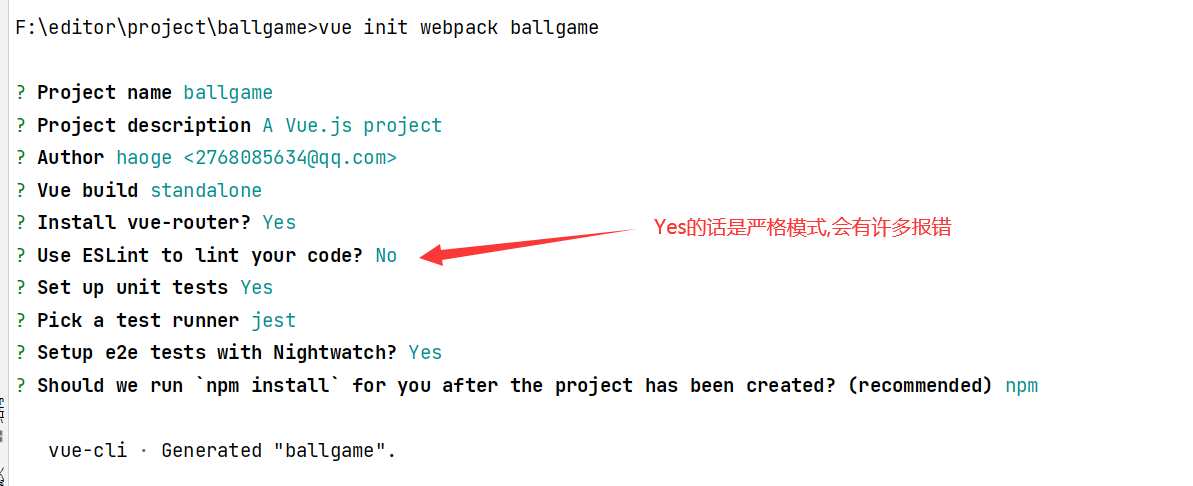
Vue项目初始化
- cnpm install vue-cli -g
- 检查是否安装成功vue list
- 创建项目vue init webpack 名字
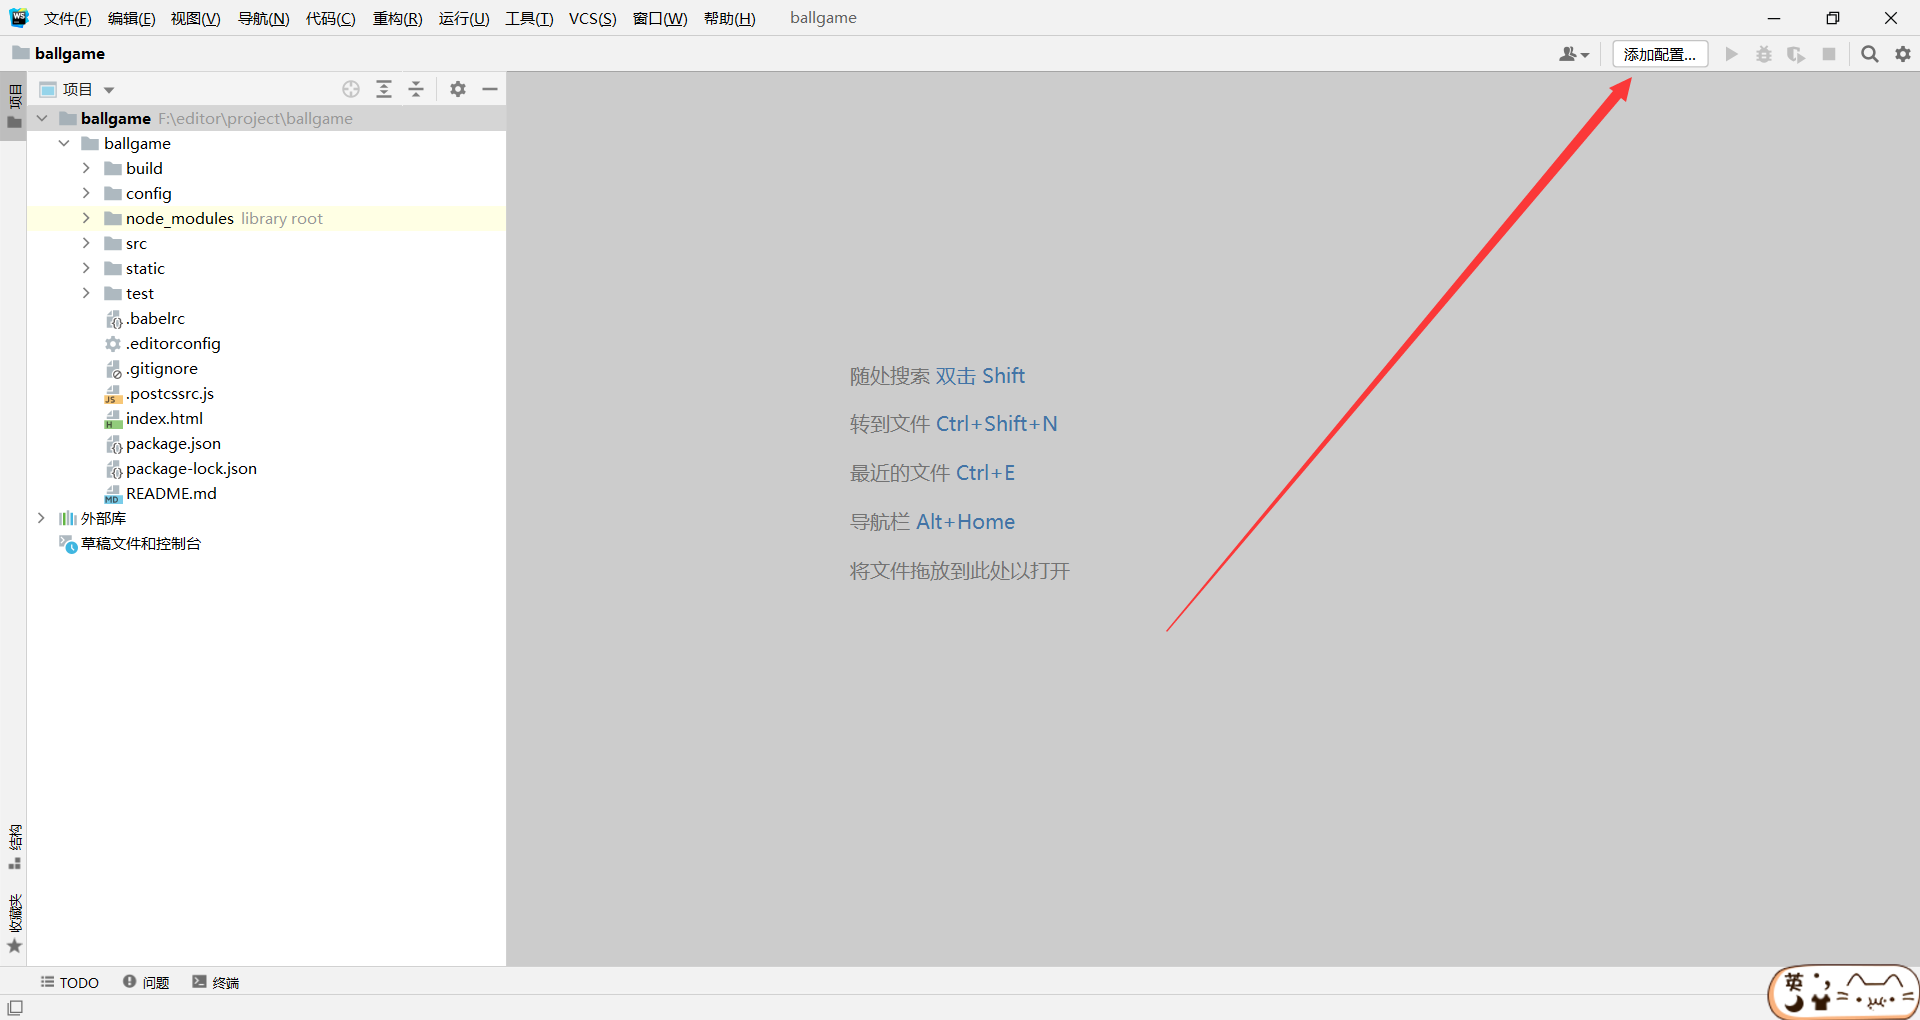
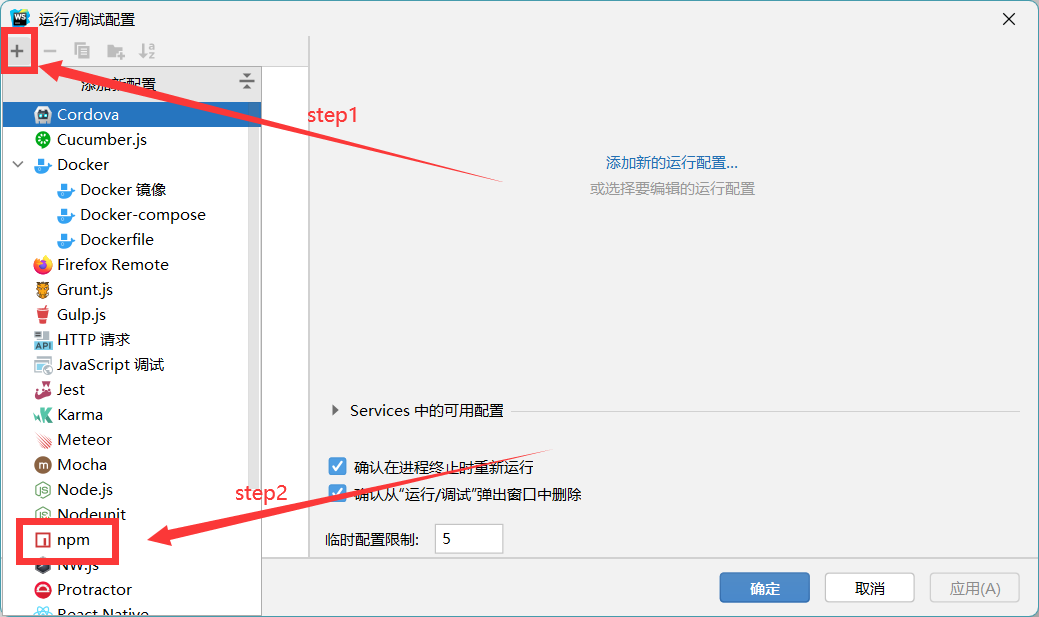
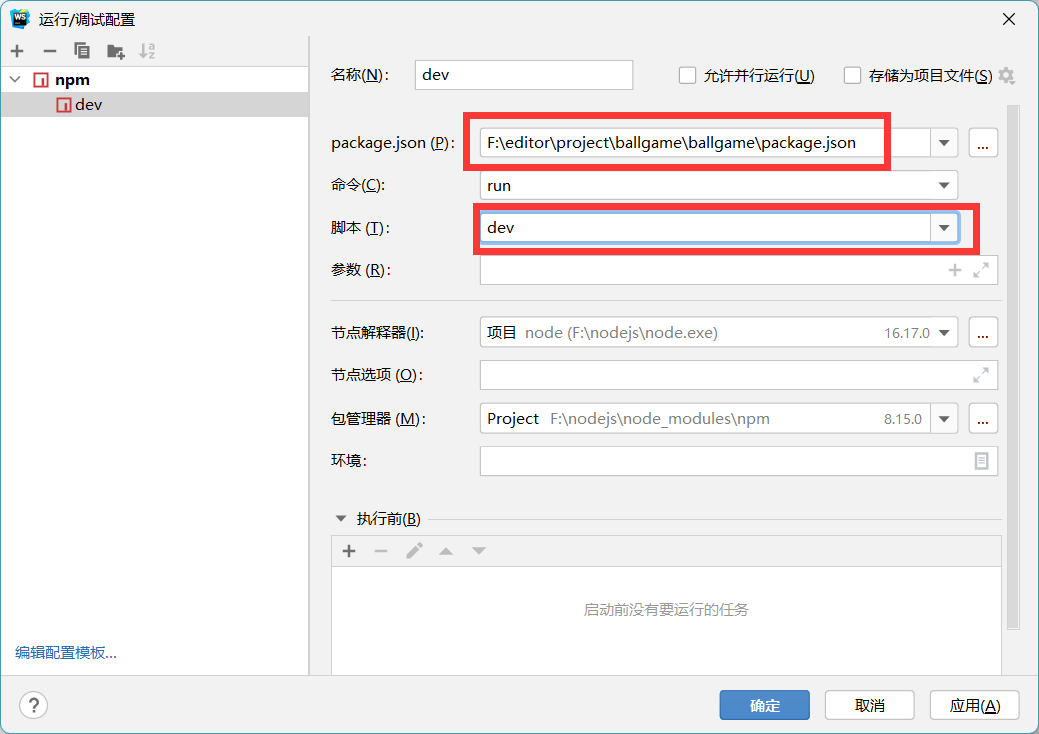
配置运行环境
axios
1
| npm install axios --save
|
element-ui
vue3中使用还需要引入
1
| npm install element-plus --save
|
在main.js中:
1
2
3
4
5
6
7
8
9
10
11
12
13
14
| import ElementUI from 'element-ui';
import 'element-ui/lib/theme-chalk/index.css';
Vue.use(ElementUI);
new Vue({
el: '#app',
router,
components: { App },
template: '<App/>',
render: h => h(App)
})
|
路由守卫
什么是路由守卫
路由守卫就是路由跳转的一些验证(登录授权等)
路由守卫种类
- 全局守卫:
- 前置守卫:
beforeEach
- 后置钩子:
afterEach
- 单个路由守卫:
- 组件内部守卫:
beforeRouteEnterbeforeRouteUpdatebeforeRouteLeave
参数说明
所有的路由守卫都是三个参数:
to要进入的目标路由from要离开的路由next是否进行下一步
注意
写next()相当于next(true)继续执行
不写next()相当于next(false)终止执行
next(path)跳转,例如:next("/login")
后置钩子afterEach没有next参数!
next()一定要写if-else否则会被调用多次!
用法
全局守卫
给需要守卫的路由加上该字段:
1
2
3
| meta: {
permission: true
}
|
全局前置守卫beforeEach
1
2
3
4
5
6
7
8
9
10
11
12
13
| router.beforeEach((to, from, next) => {
if (to.meta.permission) {
if (sessionStorage.getItem("token")) {
next();
} else {
alert("请先登录");
next("/login");
}
} else {
next();
}
});
|
全局后置钩子(很少用)
这些钩子不会接受 next 函数也不会改变导航本身
它们对于分析、更改页面标题、声明页面等辅助功能以及许多其他事情都很有用。
它们也反映了 navigation failures 作为第三个参数:
1
2
3
| router.afterEach((to, from, failure) => {
if (!failure) sendToAnalytics(to.fullPath)
})
|
路由独享守卫
你可以直接在路由配置上定义 beforeEnter 守卫:
1
2
3
4
5
6
7
8
9
10
| const routes = [
{
path: '/users/:id',
component: UserDetails,
beforeEnter: (to, from) => {
return false
},
},
]
|
beforeEnter守卫只在进入路由时触发,不会在 params、query 或 hash 改变时触发。例如,从 /users/2 进入到 /users/3 或者从 /users/2#info 进入到 /users/2#projects。它们只有在 从一个不同的 路由导航时,才会被触发。
你也可以将一个函数数组传递给 beforeEnter,这在为不同的路由重用守卫时很有用:
1
2
3
4
5
6
7
8
9
10
11
12
13
14
15
16
17
18
19
20
21
| function removeQueryParams(to) {
if (Object.keys(to.query).length)
return { path: to.path, query: {}, hash: to.hash }
}
function removeHash(to) {
if (to.hash) return { path: to.path, query: to.query, hash: '' }
}
const routes = [
{
path: '/users/:id',
component: UserDetails,
beforeEnter: [removeQueryParams, removeHash],
},
{
path: '/about',
component: UserDetails,
beforeEnter: [removeQueryParams],
},
]
|
请注意,你也可以通过使用路径 meta 字段和全局导航守卫来实现类似的行为。
组件内部守卫
beforeRouteEnter进入前beforeRouteUpdate路由变化时beforeRouteLeave离开后(通常用来禁止用户在还未保存修改前突然离开,该导航可以通过next(false)来取消)
beforeRouteEnter
beforeRouteEnter 守卫 不能 访问 this,因为守卫在导航确认前被调用,因此即将登场的新组件还没被创建。
不过,你可以通过传一个回调给 next 来访问组件实例。在导航被确认的时候执行回调,并且把组件实例作为回调方法的参数:
1
2
3
4
5
| beforeRouteEnter (to, from, next) {
next(vm => {
})
}
|
beforeRouteUpdate 和 beforeRouteLeave`
注意 beforeRouteEnter 是支持给 next 传递回调的唯一守卫。对于 beforeRouteUpdate 和 beforeRouteLeave 来说,this 已经可用了,所以_不支持_ 传递回调,因为没有必要了:
1
2
3
4
| beforeRouteUpdate (to, from) {
// just use `this`
this.name = to.params.name
}
|
这个 离开守卫 通常用来预防用户在还未保存修改前突然离开。该导航可以通过返回 false 来取消。
1
2
3
4
| beforeRouteLeave (to, from) {
const answer = window.confirm('Do you really want to leave? you have unsaved changes!')
if (!answer) return false
}
|
总结
1
2
3
4
5
6
7
8
9
10
11
12
13
14
15
16
17
18
19
| beforeRouteEnter(to, from, next) {
if (sessionStorage.getItem("token")) {
next();
} else {
alert("请先登录");
next("/login");
}
},
beforeRouteUpdate(to, from, next) {
},
beforeRouteLeave(to, from, next) {
},
|
完整导航解析流程
导航被触发。
在失活的组件里调用 beforeRouteLeave 守卫。
调用全局的 beforeEach 守卫。
在重用的组件里调用 beforeRouteUpdate 守卫 (2.2+)。
在路由配置里调用 beforeEnter。
解析异步路由组件。
在被激活的组件里调用 beforeRouteEnter。
调用全局的 beforeResolve 守卫 (2.5+)。
导航被确认。
调用全局的 afterEach 钩子。
触发 DOM 更新。
调用 beforeRouteEnter 守卫中传给 next 的回调函数,创建好的组件实例会作为回调函数的参数传入。
 微信
微信 支付宝
支付宝